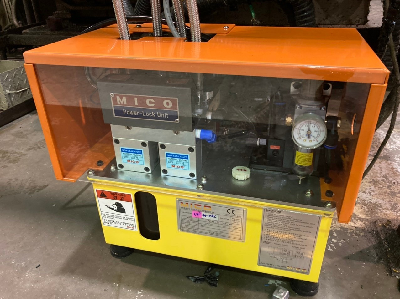
Mico Power lock unit commissioning
When air and hydraulic pipe line of the Q.D.C.system is completed, please check and maintain the Q.D.C. system as follows.
1) After hydraulic pipe line is completed, fill the oil tank with hydraulic working oil up to the upper line of the oil gauge
2) Remove foreign substance from the air pipe. (Otherwise, the unit does not operate normally.)
-Loosen the air feeding port and purge air for 1 to 2 minutes to confirm the air is exhausted.
3) Disconnect the Q.D.C. control box.
4) How to purge air from the unit.
① Adjust the air regulator to adjust the air pressure to 2~3 kg/cm2.
* Operate the pump.
② While you make loosen the air vent bolt, air is exhausted.
③ Set air pressure to 0 kg/cm2 and tighten the air vent bolt.
5) Air extraction of pipes and hydraulic hoses
① Loosen the hydraulic hoses connected to the clamp.
② Adjust the air regulator to change the air pressure by 2~3 kg/. Then release the oil.
(Prepare the oil pan)
③ Release 1~2 litres of oil to check if foreign substances such as air and dust are not coming out (replenish oil at this time) and set the air pressure to 0 kg/으로 and tighten the hose.
6) Adjust the air regulator to 4.5 kg/㎠.
* After the pump is operated, the hydraulic pressure rises to 185 kg/㎠.
7) After adjusting the pressure, fix the air regulator so that it does not loosen.
8) Check that the pump stops at 185 kg/㎠ of hydraulic pressure , and at the same time check if oil leaks from the pipe connection.
9) Operate the push button of the ‘Air Solenoid’ valve to check if the clamp and diaper are operating normally.
10) After clamping, check the flow rate and decide whether to replenish it or not. – If the flow rate is lower, replenish it.
11) Supply power to the control box.
12) Switch the Key S/W of the control box to “Mold Exchange” and check the normal operation of the clamp using each S/W.
-Check the height of the mold fastening part (reference dimension ±0.5mm) and tighten the clamp.
13) After checking the normal operation, switch the key software to “Mold Exchange” and release the clamp.
14) Fasten the mold and operate normally